Wednesday, 6 April 2016

Flowers and dinosaurs

Been a busy few weeks since my last post - but then life is busy with a baby! She's recently perfected sitting up on her own from lying down, and has grown the couple of inches she needed to be able to pull herself up on the coffee table and sofa... Keeps me busy watching her!

In terms of craft projects, it's been pretty productive. I've completed another of the Edwards menagerie range, Bruno the dinosaur and made some flowers with a free kit. Shane two of the three were started since my last post, otherwise I'd be making good progress on reducing the number of projects on the go!

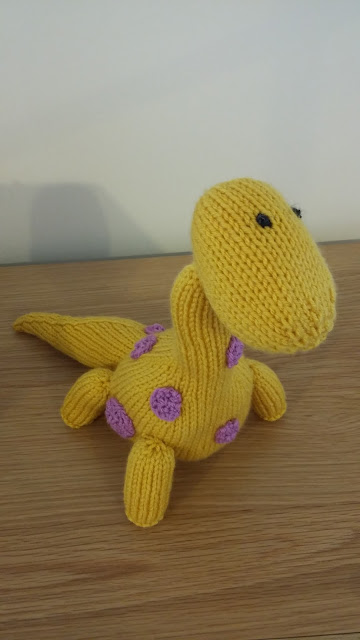
Firstly Bruno the dinosaur.

Kind of cute! Fairly easy to knit, as with all toys the sewing up is what took the time. I have plansto make a pink version, once I make the other five in the collection (so probably around 2030!). The pattern is from Deramores, and I've used the recommended wool - Deramores studio DK. It was actually really nice to work with, and affordable too (always a bonus!).

Now meet Benedict the chimpanzee. He's the crochet animal I've made from Edwards menagerie this month. He's made in paton fab yarn, which is cheap and cheerful and ideal for a toy my baby daughter is going to chew, throw and generally try to destroy!


He was really quick to crochet, taking around four hours over the Easter Bank holiday weekend. Plus there's less sewing up with crochet toys! I only wish I'd stuffed him more - he's quite the skinny monkey.

Finally, today's project has been a flower broach from a kit on the latest issue of Simply Crochet. It only took about an hour and looks great - the kit flower is the one in the middle.


The two smaller flowers are my own design to use up the leftover yarn. I've included the pattern for the top one below:

Starting with yellow, chain 4 and slip stitch into the first chain to make a ring.
Round 1 - chain 3, then work 11 treble crochet into the ring, then slip stitch to the top of the first chain. You should now have 12 stitches. Change to red.
Round 2 - * chain 3, skip one treble stitch and slip stitch into the next stitch. Repeat from * five times more.
Round 3 - into each chain work a double crochet, half treble, double crochet. Change to mid pink.
Round 4 - chain 4, then work a double crochet into the back of the slip stitch on the previous round. Repeat this five times more, so there will be six outer petals.
Round 5 - * working into each stitch, work a double crochet, then two double crochet into the back loop only, a double crochet and a slip stitch into the double crochet from the previous round. Repeat from * five more times. Change to light pink.
Round 6 - * work a double crochet into the next stitch, then a half treble and then a treble into the next stitch, a treble then a half treble into the next stitch, and a double crochet into the next stitch, and a slip stitch into the final stitch of the petal. Repeat from * five times more before fastening off.
To work the leaf join green to the middle back of one of the petals. Chain 4 and slip stitch into the back of the next petal. Into this chain loop work a double crochet, half treble, treble, chain 3 then slip stitch into the first chain, treble, half treble then a final double crochet. Fasten off and sew in the ends.

I think that's the first ever crochet item I've designed! And all because I had some yarn left and my daughter was still napping. If you give it a go and something isn't clear do let me know - worth noting the terms used are UK crochet terms.

I hope you enjoyed the pattern, and I hope to be back in a couple of weeks with more exciting projects completed - I only have a buttonhole to do on the skirt and then it's finished...
Tuesday, 22 March 2016

Time flies when you're busy crafting

How has it been over two months since my last post? A lot has changed with regards my little one's routine - she now sleeps much better. At the moment though I don't, thanks to a particularly miserable cold I can't shake off.

In addition to feeling lousy for the past week (which feels like forever!) since my last post I have been away to the Isle of Wight, had a poorly baby (where else would I get a cold) and managed to squeeze in a craft show at the NEC. For the latter my loving husband got dragged along as on the day my best friend (who was supposed to be joining me) couldn't make it as she was sick. He was very good though, and didn't complain when I spent all his money! Now I have lots of new projects I want to do...

Anyway, one advantage of my little girl now napping is I get more time for crafts (finally - maternity leave is as I imagined it!). So I've naturally started about a thousand new things, from an Easter basket to a snake! I have also managed to get a couple of things actually finished - a crochet polar bear and a knitted snail.

Firstly, the polar bear. He's from the Edward's menagerie range, same as the elephant from an earlier post. Again, he was quick to make and very straightforward. The next animal I have in mind is a zebra, which will be a little more challenging! Here's a picture:


I would definitely recommend this as a great beginner project - the book contains all the basics in a clear, well explained way. The only problem with it is there are so many lovely animals I want to make them all!

Next, the snail. This was a small project from a free kit that I took to the Isle of Wight with me. It was quick to finish, though I think black was a bit strong for the eyes as it looks a bit alien! See what you think:


Actually that picture makes her look a bit sad, poor snail.

Next time I'll hopefully have some more projects finished - my aims are for Bruno the dinosaur and a skirt I've had on the go for a very long time! Plus given its Easter next weekend I should probably get the basket finished... Also I'm hopeful it will be two weeks to the next post, not two months, but with a baby who knows!

Thursday, 21 January 2016

Olive the owl

Given its been almost two weeks since my last post, and I've just finished a project so I figured I should write about it. I've also been making good progress on a cardigan that I've targeted to finish by the end of January (though that's not looking likely now - maybe I should target the end of February!) - the back is now complete which is the largest part so it feels good having that completed! I'll post a picture when it's finished.

So the project I've just finished is Olive the owl. I hadn't actually planned on knitting it, but it was a free kit with Let's Knit magazine a while back. I decided to have a go when my mum called to ask if I'd done it, as she also had the kit but had run out of the dark pink (and so wanted to know if I had any spare). Wanting to help, I started it that evening.

That phone call was last night, and I've now finished it:


Pretty cute, and a very quick knit. The pattern is fairly simple to do - three of the four rows of the pattern are stocking stitch, the other uses simple increases and decreases to give the curved stripe effect. It only took a few hours to complete. The pattern is available for free here.

Oh, and if you're interested I had 60cm of the dark pink yarn left. I'm yet to hear whether it's enough for my mum to finish hers.

Now I really should get on with finishing some of the many projects I've started already!

Tuesday, 12 January 2016

New year, new resolution

So I don't think I achieved my aim of finishing the year with fewer projects on the go than I started the year. So I will once again make that my aim...

I've actually made a good start. Helped by starting to use gentle sleep training techniques so my daughter naps in her cot not on me! Currently on day four and it took 5 minutes to get her down and she's been there for 45 minutes... At this rate I'll actually get housework done in the week!

So to the craft projects. Firstly, I started making a monkey rattle way back when my friend told me she was pregnant back in summer 2013. It's been knitted for a long time, it just needed making up. Anyway I've now finally got round to doing so:


I did make one mistake - around the eyes there is supposed to be a patch of cream, which I did knit, but then I sewed the nose over it! It's knitted in a cotton yarn, Rowan handknit cotton, and is in garter stitch so very quick to knit. However, because it's cotton yarn there is no stretch, which made it fairly tricky to sew up and turn the right way round. It is quite cute though, and my daughter likes it because it makes noise! That and the arms are nice and chewy.

The second project I've finished recently is one of the bags I keep mentioning. This one is grey, and was my first crochet project. It's essentially a rectangle of double crochet, folded and side seams sewn, and a handle added by making a chain of the length you want.

I then decided to line it in a floral blue cotton fabric to finish it off:


So to the third project. This one is probably the most complicated that I've completed to date. It almost went in the bin on more than one occasion! In fact it was only the first part that was tricky, once past the lace top it was rather easy. It was knitted in one piece from the top down, in a Rico cotton variegated yarn. Here it is:


I really like this, and once over the tricky lace it was really easy to knit. Plus the lack of making up is a bonus! I finished it off with cute flower buttons. The only problem is it would fit my daughter now, but it's winter and too cold! Yet there is no way I could guess that at nearly 7 months she'd only just be fitting into 3 to 6 month clothing.

Anyway, I think that's enough for today, if nothing else I've not finished anything else! I have a few things in the pipeline though, so hopefully I'll have a new post in a couple of weeks with a few more projects finished. Also I should have my new laptop up and running, so I can use my camera to improve the quality of the pictures.


Tuesday, 22 December 2015

Almost Christmas... but still time for a bit of crafting!

So since last time I've not had a huge amount of time for crafts - my 6 month old keeps me very busy with an array of baby classes. I have managed to make an elephant and get her involved in crafts though!

Firstly, the elephant. Now I discovered some time ago whilst my baby naps I can crochet. She doesn't tend to nap without a cuddle, and if she doesn't nap gets very grouchy, so being able to crochet whilst she does so is a huge bonus!

I was at the international knitting and stitching show a few weeks back with my best friend, and Toft had a stall there. They sell luxury alpaca wool and also created the Edward's menagerie series of toys. I've liked them for a while, and now have someone to make them for! So I bought the book and some silver wool and set about creating Bridget the elephant. She didn't take long to make at all, and was very easy too. I'm rather happy with the end result, and the wool was lovely to work with. I'd highly recommend them, even for a complete beginner.  Here's a picture:


The other thing I've done recently is some painting with my daughter at a Christmas baby class. It was run by Rainbow Rhyme, a local baby class, and was great fun! There were songs, different musical instruments, and in the middle a creative bit. I was sceptical as to what a 6 month old could do, but they had some inspiration of how to turn footprints into Christmas artwork. Below are the resulting pictures - I actually think they're pretty good! (Yes, I'm one of those parents now that thinks whatever their child does is amazing!) It's amazing what sticking on a few googly eyes can do!


Anyway, this will (unsurprisingly, given the date) be the last post before Christmas so I hope you have a wonderful time with family and friends, and I'll be back in the new year when hopefully I'll have finally finished those bags I keep mentioning...

Tuesday, 1 December 2015

Crafting can be like buses...

So, after not much crafting in the months after becoming a mum, I seem to have been on a roll over the past week or so! And I even managed to finish a project that has been in progress for about 2 years - a heart bauble. Now to work on the rest of the ongoing projects... Though in true me style I wrote this last month and forgot to publish it! Oops.

So one thing I've made progress on is the bag I've been making. It turned out I'd cut a couple of pieces out the wrong way (if I'd used them the elephants wouldhave been on their side!) so I've rectified that. I've also managed to make the inside pockets. There are formed by sewing the rectangle so the wrong side can't be seen, then creating a box pleat in the middle when attaching it to the lining:


So back to the bauble. This might have been a bit ambitious - I started it with little colour work experience, and no experience of double pointed needles. On the plus side, being worked in the round meant minimal seems to sew up! Once I got the hang of it, it wasn't so bad, but I must admit making several mistakes and getting rather frustrated, hence why it took so long to finish! Here's a picture of it in progress, working in the round:


I discovered when I'd nearly finished that the right side was supposed to be facing outwards. Perhaps that would have meant the joins between the needles would have left fewer gaps... Should have mentioned - the pattern is from a book called 'Knit your heart out' which is a collection of heart patterns all worked in the round. The instructions weren't most clear in places, but I eventually worked it out with a bit of help from the Internet!

The resulting piece is one that isn't my finest piece of knitting, but still something that will be proudly placed on my Christmas tree (though perhaps towards the back!). Here's the finished item:


Once I'd finished that, I decided I wanted to finish something a bit easier so chose to start a new decoration - this time a stocking from a free magazine kit. This was much more straightforward, though I managed to forget a colour change so it's not perfect! It was however quick to knit, meaning I could finish it whilst my daughter slept (on me - she rarely stays asleep when I put her down).

Here's the finished item:


Anyway I think that's enough for now, next time I'll hopefully have finished those bags I mentioned in my post way back in 2014...

Saturday, 31 October 2015

The waiting is over

So as you've probably guessed by now, since no one has ever been pregnant for over 12 months, my baby finally decided to make her appearance. On the same day as I posted the last update! I knew when posting it wouldn't be long, and called the hospital just after I posted it - little did I know it would be only four hours before I was holding her in my arms!

And I have to say, whilst now I wouldn't change it for the world, the first 6 weeks in particular were rather tricky as we adapted to our new lives and didn't ever sleep... Turns out sleep deprivation does strange things. But hey, we do have the most wonderful, interested baby who's become very entertaining - even if she hates sleep with a loathing passion!

As I'm sure you can guess life with a newborn (particularly our high maintenance one) isn't exactly full of opportunities to craft...  Some days simply managing to eat lunch is a major achievement! However, now she's over four months old (well that went quick!) she's more settled and I manage to squeeze in the odd session.

Now, life has been made harder my the fact someone broke into my house at the end of August, taking with them my laptop (along with most of my jewellery and handbags and some other tech). Why is this relevant here? Unfortunately I'd been drafting a blog post in Word on it, so that went with it along with photos of craft projects that were on my laptop / camera. Which also explains why the photos on this post are a lower quality than usual - I've had to use my phone as they took all three of my cameras.

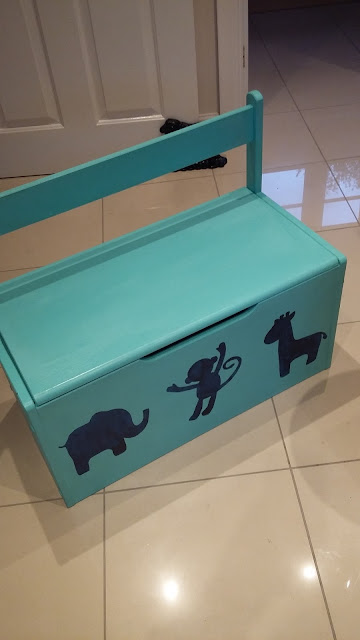
So, that was a lot of waffle, well done for reading this far! The project that was going to be central to this post is one that my husband has been helping with. Basically we have a lot of colourful toys and had nowhere to put them. Looking at toybox options, they were so expensive! So being the sort of person I am, I decided the best thing to do was buy a plain one and paint it.

Now I'd already made pictures for her room (see a previous post) and thought it would be great if the toy box matched those. So we found a paint to match one of the elephants, and a contrasting one to stencil some animals on it. Luckily they had an offer on tester pots so they were a steal at £1 each.

My wonderful husband (yes, I'm biased on the issue!) then painted the whole thing in the lighter base colour.

The next step was to add the animals to it, which he kindly let me do (I suspect as this was trickier he didn't want to get it wrong!). To do this, I printed out silhouettes of an elephant and giraffe that matched the pictures, as well as a monkey in a similar style. I then used a craft knife to cut out the animal shapes. Then I simply placed them where I wanted them to be on the toybox before painting them in the darker paint.

Last step was a layer of varnish once the paint had dried to help ensure dirt from grubby fingers can be wiped away!

Here's it in progress:


It was horrible waiting for the paint to dry so I could have a look! A few bits had leaked round the edges but were easily touched up with a bit of extra paint.

Here's the finished thing:


I'm rather pleased with it. Hopefully once she's old enough to express an opinion, so will my daughter!

Now given my adorable baby takes up so much of my time, and we're doing so many baby classes, I'm going to aim for this blog to be updated once every couple of weeks for a little while. Feels more achievable! Might be less often, but we'll see how it goes. So, until next month, have fun!