So as you've probably guessed by now, since no one has ever been pregnant for over 12 months, my baby finally decided to make her appearance. On the same day as I posted the last update! I knew when posting it wouldn't be long, and called the hospital just after I posted it - little did I know it would be only four hours before I was holding her in my arms!
And I have to say, whilst now I wouldn't change it for the world, the first 6 weeks in particular were rather tricky as we adapted to our new lives and didn't ever sleep... Turns out sleep deprivation does strange things. But hey, we do have the most wonderful, interested baby who's become very entertaining - even if she hates sleep with a loathing passion!
As I'm sure you can guess life with a newborn (particularly our high maintenance one) isn't exactly full of opportunities to craft... Some days simply managing to eat lunch is a major achievement! However, now she's over four months old (well that went quick!) she's more settled and I manage to squeeze in the odd session.
Now, life has been made harder my the fact someone broke into my house at the end of August, taking with them my laptop (along with most of my jewellery and handbags and some other tech). Why is this relevant here? Unfortunately I'd been drafting a blog post in Word on it, so that went with it along with photos of craft projects that were on my laptop / camera. Which also explains why the photos on this post are a lower quality than usual - I've had to use my phone as they took all three of my cameras.
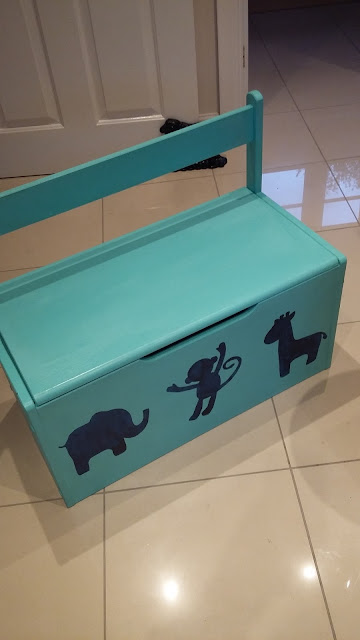
So, that was a lot of waffle, well done for reading this far! The project that was going to be central to this post is one that my husband has been helping with. Basically we have a lot of colourful toys and had nowhere to put them. Looking at toybox options, they were so expensive! So being the sort of person I am, I decided the best thing to do was buy a plain one and paint it.
Now I'd already made pictures for her room (see a previous post) and thought it would be great if the toy box matched those. So we found a paint to match one of the elephants, and a contrasting one to stencil some animals on it. Luckily they had an offer on tester pots so they were a steal at £1 each.
My wonderful husband (yes, I'm biased on the issue!) then painted the whole thing in the lighter base colour.
The next step was to add the animals to it, which he kindly let me do (I suspect as this was trickier he didn't want to get it wrong!). To do this, I printed out silhouettes of an elephant and giraffe that matched the pictures, as well as a monkey in a similar style. I then used a craft knife to cut out the animal shapes. Then I simply placed them where I wanted them to be on the toybox before painting them in the darker paint.
Last step was a layer of varnish once the paint had dried to help ensure dirt from grubby fingers can be wiped away!
Here's it in progress:
It was horrible waiting for the paint to dry so I could have a look! A few bits had leaked round the edges but were easily touched up with a bit of extra paint.
Here's the finished thing:
I'm rather pleased with it. Hopefully once she's old enough to express an opinion, so will my daughter!
Now given my adorable baby takes up so much of my time, and we're doing so many baby classes, I'm going to aim for this blog to be updated once every couple of weeks for a little while. Feels more achievable! Might be less often, but we'll see how it goes. So, until next month, have fun!


No comments:
Post a Comment